A Guide to Installing Outdoor LED Landscape Lighting

Struggling with complex 12v outdoor lights installation? Transform your garden with our step-by-step LED landscape lighting guide. Discover pro tips today!
Table of Contents
Installing outdoor LED landscape lighting can feel overwhelming when you’re staring at boxes of fixtures, transformers, and miles of wire without a clear roadmap. Many homeowners abandon their lighting projects halfway through, frustrated by confusing instructions and unexpected complications that turn weekend DIY dreams into costly professional callouts.
The good news is that modern LED landscape lighting systems are more user-friendly than ever, especially when you understand the proper sequence and techniques for successful installation. This comprehensive guide walks you through every step of the process, from initial planning to final adjustments, ensuring your outdoor lighting project delivers professional results without professional headaches.
Whether you’re illuminating a small garden bed or designing a complete property lighting system, following these proven methods will help you avoid common mistakes while creating the stunning outdoor environment you’ve always envisioned. Let’s transform your dark outdoor spaces into beautifully lit landscapes that enhance your property’s beauty, safety, and value.
Assessing Your Landscape: Identifying Key Areas to Illuminate
Successful landscape lighting begins with thorough site assessment that identifies opportunities and challenges unique to your property. Start by walking your outdoor spaces during different times of day to understand how natural light affects various areas and features throughout the changing seasons.
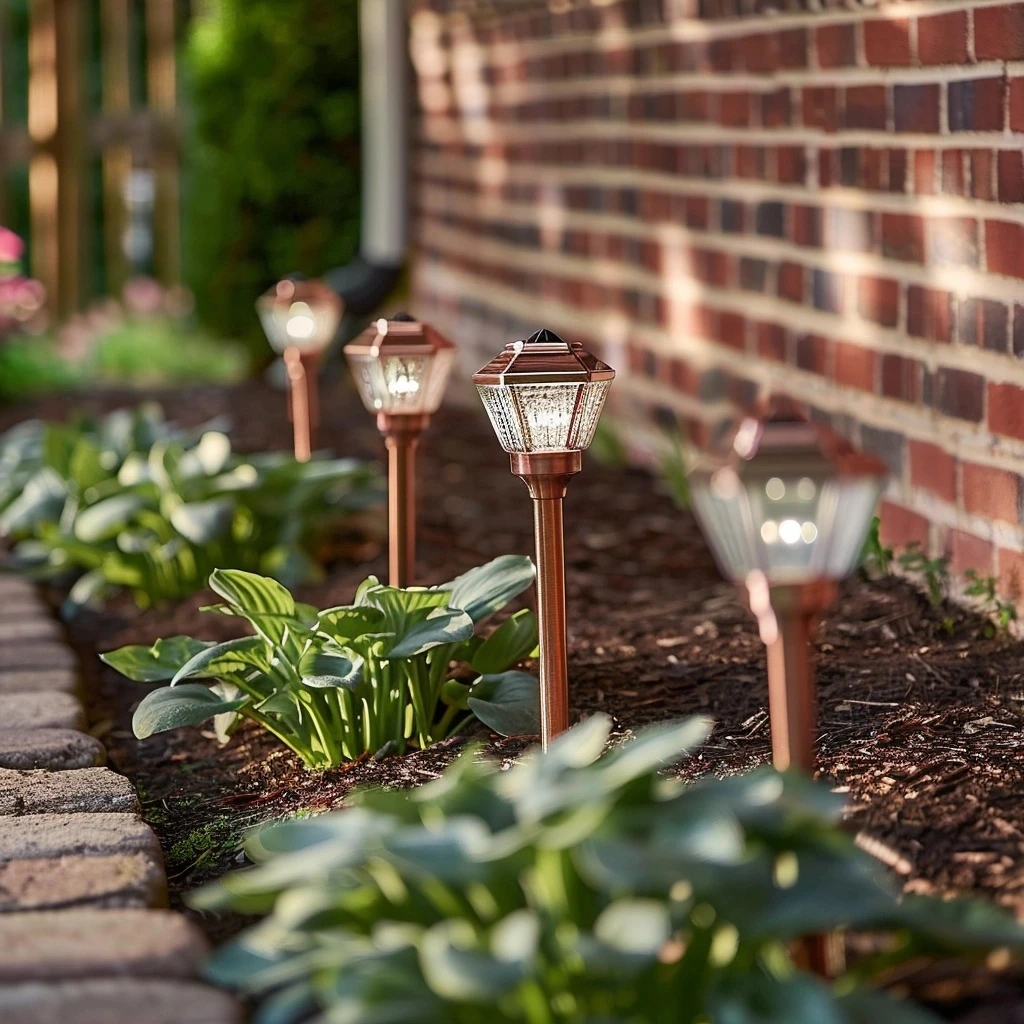
Key focal points deserve priority attention in your lighting plan. Mature trees with interesting bark textures or architectural branching patterns create stunning visual anchors when properly illuminated. Water features like fountains, ponds, or waterfalls become magical centerpieces under strategic lighting that emphasizes movement and reflection.
Architectural elements offer excellent opportunities for dramatic lighting effects. Stone walls, columns, pergolas, and outdoor structures gain new life when highlighted with carefully positioned fixtures. These permanent features provide year-round visual interest and help define your outdoor spaces even when seasonal plantings change.
Safety considerations must influence your assessment process. Identify areas where additional illumination would prevent accidents or improve navigation. Steps, elevation changes, pathway intersections, and potential obstacles need adequate lighting to ensure safe movement throughout your outdoor areas.
Existing landscaping investments deserve protection and enhancement through proper lighting. Specimen plants, garden beds, and hardscaping features represent significant investments that gain increased visibility and impact when showcased with appropriate illumination techniques.
Consider views from inside your home when assessing lighting opportunities. Well-designed outdoor lighting creates beautiful vistas through windows and glass doors, extending your interior living spaces visually into the landscape and providing year-round enjoyment of your outdoor investments.

Considering the Purpose of Lighting
Understanding your lighting goals helps determine the types of fixtures, placement strategies, and control systems that will best serve your needs. Different purposes require different approaches, and successful installations often combine multiple lighting objectives within a cohesive overall design.
Aesthetic lighting focuses on creating beautiful visual effects that showcase your landscape’s best features. This approach emphasizes drama, visual interest, and artistic expression through strategic use of light and shadow. Uplighting, downlighting, and accent techniques work together to create layered lighting effects that transform ordinary landscapes into extraordinary outdoor environments.
Functional lighting prioritizes practical needs like navigation, safety, and task illumination. Path lighting guides movement along walkways and garden borders while providing subtle beauty that doesn’t overwhelm surrounding plantings. Area lighting creates usable spaces for outdoor dining, entertaining, and relaxation activities.
Security lighting deters criminal activity while providing clear visibility around entry points and vulnerable areas of your property. Motion-activated fixtures conserve energy while providing instant illumination when needed. Strategic placement eliminates dark hiding spots and creates comprehensive coverage without creating light pollution.
Entertaining considerations influence lighting decisions for homeowners who frequently host outdoor gatherings. Dimmer controls, multiple lighting zones, and decorative fixtures create ambiance appropriate for different occasions, from intimate dinners to larger celebrations.
Seasonal adaptability becomes important in climates with significant weather variations. Your lighting system should provide year-round beauty and functionality, accounting for deciduous plants that change dramatically between seasons and weather conditions that affect visibility and safety.
Choosing the Right LED Lights: Types of LED Lights Available
Modern LED technology offers numerous fixture types designed for specific landscape lighting applications. Understanding these options helps you select the right combination of fixtures to achieve your desired lighting effects while maximizing energy efficiency and longevity.
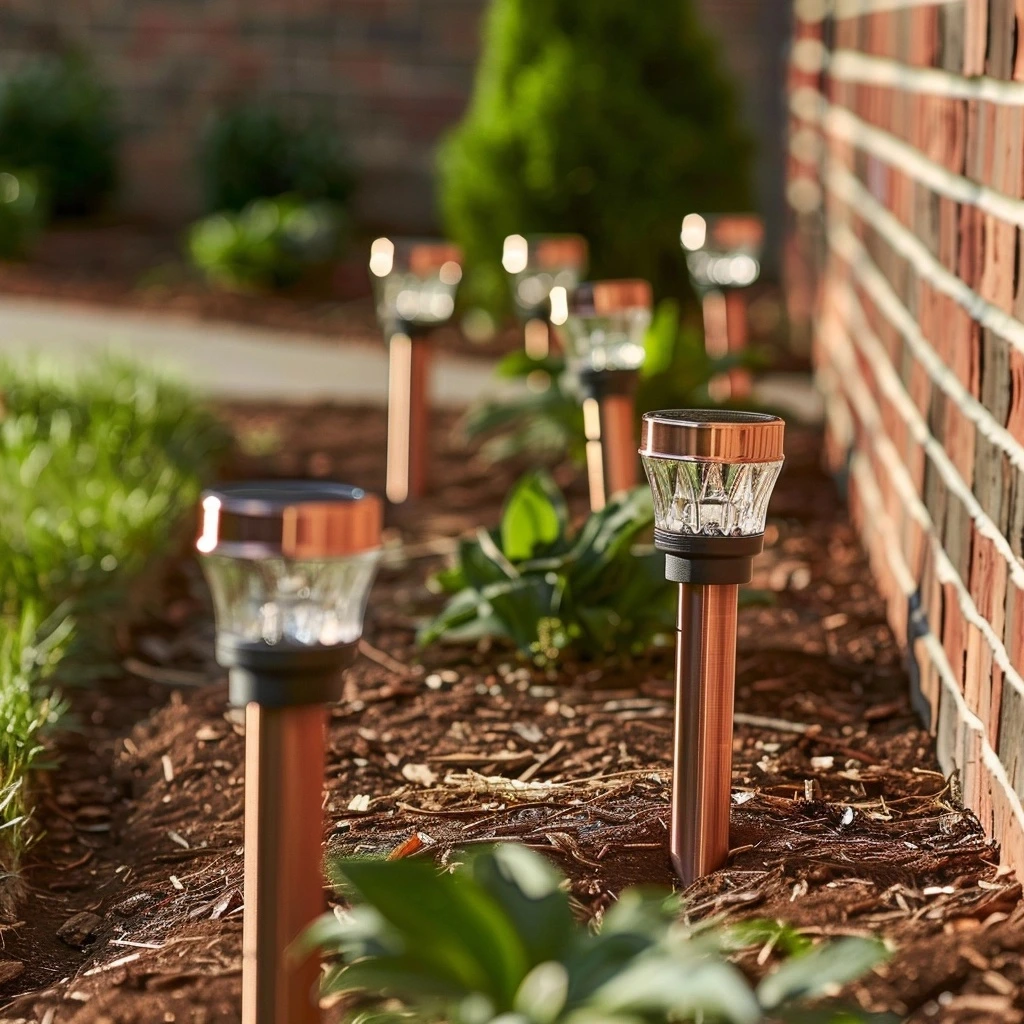
Path lights provide low-level illumination along walkways, driveways, and garden borders. These fixtures typically stand 12-24 inches high and cast gentle pools of light that guide movement without creating glare. Available in various styles from traditional lanterns to contemporary geometric designs, path lights offer both functional and aesthetic benefits for most landscape lighting projects.
Spotlights deliver focused beams ideal for highlighting specific features like trees, sculptures, or architectural details. These adjustable fixtures allow precise aiming and come in various beam angles from narrow spots to wide floods. Many models include interchangeable lenses that provide additional control over light distribution patterns.
Well lights install flush with the ground to provide uplighting effects without visible fixtures. These robust units withstand foot traffic and lawn maintenance while creating dramatic uplighting for trees, walls, and architectural features. Proper drainage and quality construction are essential for reliable performance in ground-level installations.
Step lights integrate into stairs, retaining walls, and other vertical surfaces to provide safety illumination while adding architectural interest. These compact fixtures create subtle lighting effects that enhance safety without overwhelming surrounding elements.
String lights and linear fixtures create ambient lighting perfect for entertaining areas and decorative applications. Modern LED versions offer durability and energy efficiency while providing the warm, inviting atmosphere associated with traditional incandescent string lighting.
Flood lights provide broad area illumination for security applications and large space lighting. While less common in decorative landscape lighting, these fixtures serve important functional roles in comprehensive outdoor lighting systems.
Factors to Consider When Selecting Lights
Several critical factors influence fixture selection decisions that affect both immediate installation success and long-term system performance. Making informed choices during the planning phase prevents costly mistakes and ensures optimal results for your specific application.
Light output requirements vary significantly based on the intended application and surrounding conditions. Path lighting typically requires 50-150 lumens per fixture, while accent lighting for large trees might need 300-800 lumens or more. Consider ambient light levels, surrounding reflective surfaces, and desired lighting effects when determining appropriate output levels.
Beam angle selection affects how light spreads from each fixture. Narrow beam angles concentrate light on specific targets, while wider angles provide general area illumination. Many applications benefit from adjustable fixtures that allow fine-tuning after installation to achieve optimal lighting distribution.
Color temperature influences the mood and appearance of your outdoor lighting. Warm white LEDs (2700K-3000K) create inviting, comfortable atmospheres similar to traditional incandescent lighting. Cool white options (4000K-5000K) provide crisp, bright illumination better suited for security and task lighting applications.
Build quality directly impacts long-term reliability and maintenance requirements. Look for fixtures with robust housings, quality LED chips, and weather-resistant construction rated for your local climate conditions. Integrated heat management systems extend LED lifespan and maintain consistent performance over time.
Compatibility with your chosen control system affects both installation complexity and ongoing functionality. Ensure selected fixtures work properly with dimmer controls, timers, and smart home integration systems you plan to implement.
Budget considerations must balance initial costs with long-term value. Higher-quality fixtures typically cost more upfront but provide better performance, longer lifespans, and reduced maintenance requirements that justify the additional investment over time.
Gathering Tools and Materials
Proper preparation with the right tools and materials makes the difference between a smooth installation process and a frustrating experience filled with delays and complications. Investing in quality tools and organizing materials before beginning work ensures efficient progress and professional results.
Essential Tools: List of Necessary Tools
Wire strippers designed for low-voltage applications provide clean, precise cuts without damaging delicate LED wiring. Look for models with multiple gauge settings and comfortable grips that reduce hand fatigue during extended use. Quality wire strippers prevent connection problems that can cause system failures.
A multimeter becomes essential for testing voltage levels, checking continuity, and troubleshooting electrical issues. Digital models with large displays and automatic ranging simplify use for DIY installers. This tool helps verify proper transformer output, identify wiring problems, and ensure safe installation practices.
Trenching tools range from simple hand spades for small installations to powered trenching machines for extensive systems. The choice depends on your project scope, soil conditions, and physical capabilities. Hand tools work well for most residential installations, while larger projects benefit from mechanical assistance.
A drill with various bits handles fixture mounting, transformer installation, and cable routing tasks. Cordless models provide mobility advantages, while corded versions offer consistent power for demanding applications. Include masonry bits for concrete work and hole saws for cable routing through structures.
Wire nuts and waterproof connectors ensure reliable electrical connections that withstand outdoor conditions. Use only connectors rated for direct burial applications when making underground splices. Quality connections prevent voltage drops and system failures that compromise lighting performance.
Cable locating equipment helps mark underground utilities and existing wiring before digging. This safety equipment prevents dangerous encounters with electrical, gas, or water lines that could cause injuries or expensive damage. Many areas require professional utility marking before any excavation work.
A headlamp or flashlight becomes essential for work during low-light conditions and for inspecting completed installations. Hands-free lighting allows safe tool use while providing adequate illumination for detailed electrical work.
Tips for Choosing Quality Tools
Investment in quality tools pays dividends through improved efficiency, better results, and extended tool life. Professional-grade tools often cost more initially but provide superior performance and durability that justify the additional expense for serious DIY projects.
Ergonomic design features reduce fatigue and improve precision during extended use. Tools with comfortable grips, balanced weight distribution, and intuitive controls make challenging installations more manageable and enjoyable.
Brand reputation provides guidance when selecting unfamiliar tools. Established manufacturers with strong warranties and customer support offer confidence that tools will perform reliably and receive support if problems arise.
Multi-purpose tools maximize value by handling multiple installation tasks. Combination tools that integrate several functions reduce the number of items needed while providing versatility for unexpected situations.
Battery compatibility becomes important for cordless tools used in multiple applications. Choosing tools that share battery platforms reduces costs and simplifies charging logistics for comprehensive tool collections.

Additional Materials for Installation
Beyond basic tools, successful installations require various materials that support proper system function and long-term reliability. Planning ahead ensures all necessary components are available when needed, preventing installation delays and incomplete work.
12v outdoor lights require appropriate transformers sized for the total system load with adequate capacity for future expansion. Calculate total wattage requirements and select transformers with 20-30% excess capacity to ensure reliable operation and accommodation of additional fixtures.
Low voltage led landscape lighting systems need proper gauge wiring to minimize voltage drop and ensure adequate power delivery to all fixtures. Use manufacturer recommendations for wire sizing based on total load and distance from the transformer to the furthest fixtures.
Wired landscape lights benefit from professional-grade direct burial cable rated for underground installation. This specialized wiring withstands moisture, temperature fluctuations, and mechanical stress better than standard electrical wire, ensuring long-term system reliability.
Wire marking tape identifies underground cables for future reference and safety. This brightly colored tape installed above buried cables alerts future excavation activities to the presence of electrical wiring, preventing accidental damage during landscaping or construction work.
Conduit provides additional protection for wiring in high-traffic areas or locations where mechanical damage is likely. While not always required for low-voltage installations, conduit offers peace of mind and extended wire life in challenging environments.
Waterproof junction boxes house electrical connections that need protection from moisture and environmental conditions. These enclosures provide secure mounting points for splices and connections while maintaining system reliability in all weather conditions.
Preparing the Installation Site
Thorough site preparation creates the foundation for successful installations while preventing problems that could compromise system performance or create safety hazards. This phase requires careful attention to both immediate installation needs and long-term system considerations.
Call utility marking services before any excavation work to identify underground utilities and prevent dangerous accidents. This free service typically requires 48-72 hours advance notice and provides essential safety information for any project involving digging or trenching.
Layout planning translates your lighting design into physical fixture locations and wire routing plans. Use spray paint or flags to mark fixture positions, allowing you to visualize the final installation and make adjustments before committing to permanent installation.
Soil preparation may be necessary in areas with challenging digging conditions. Rocky or clay soils benefit from pre-treatment that makes trenching easier and reduces installation time. Consider soil amendments that improve drainage around fixture locations to prevent water accumulation issues.
Existing landscape protection prevents damage to valuable plants and hardscaping during installation. Use protective covers, temporary barriers, and careful planning to minimize disruption to established landscaping elements.
Access route planning ensures efficient material transport and tool access to all work areas. Consider how equipment, materials, and workers will reach different parts of your property without causing unnecessary damage or creating safety hazards.
Weather considerations affect both installation timing and material protection. Avoid installation during wet conditions that make digging difficult and electrical work dangerous. Plan material storage that protects sensitive components from moisture and temperature extremes.
Testing and Adjusting the Lighting: Initial Testing
Comprehensive testing verifies proper system function and identifies issues before they cause problems or safety hazards. This systematic approach ensures reliable operation and optimal performance from your newly installed 12 volt outdoor lights.
Voltage testing at the transformer confirms proper output levels and identifies potential electrical issues before they affect system performance. Use a multimeter to verify transformer output matches manufacturer specifications and provides stable power delivery.
Circuit testing verifies proper wiring connections and identifies potential voltage drop issues that could affect fixture performance. Test each circuit separately to isolate problems and ensure balanced loads across multiple circuits.
Individual fixture testing confirms proper operation and light output from each installed component. This systematic approach identifies defective fixtures, connection problems, or aiming issues that need correction.
Photocell and timer testing ensures automatic controls function properly and provide intended operation schedules. Verify that light sensors respond appropriately to changing light conditions and timer settings match your desired operation patterns.
Load testing under full system operation identifies potential overload conditions or transformer capacity issues. Run the complete system for extended periods to verify stable operation and identify any components that overheat or malfunction under normal operating conditions.
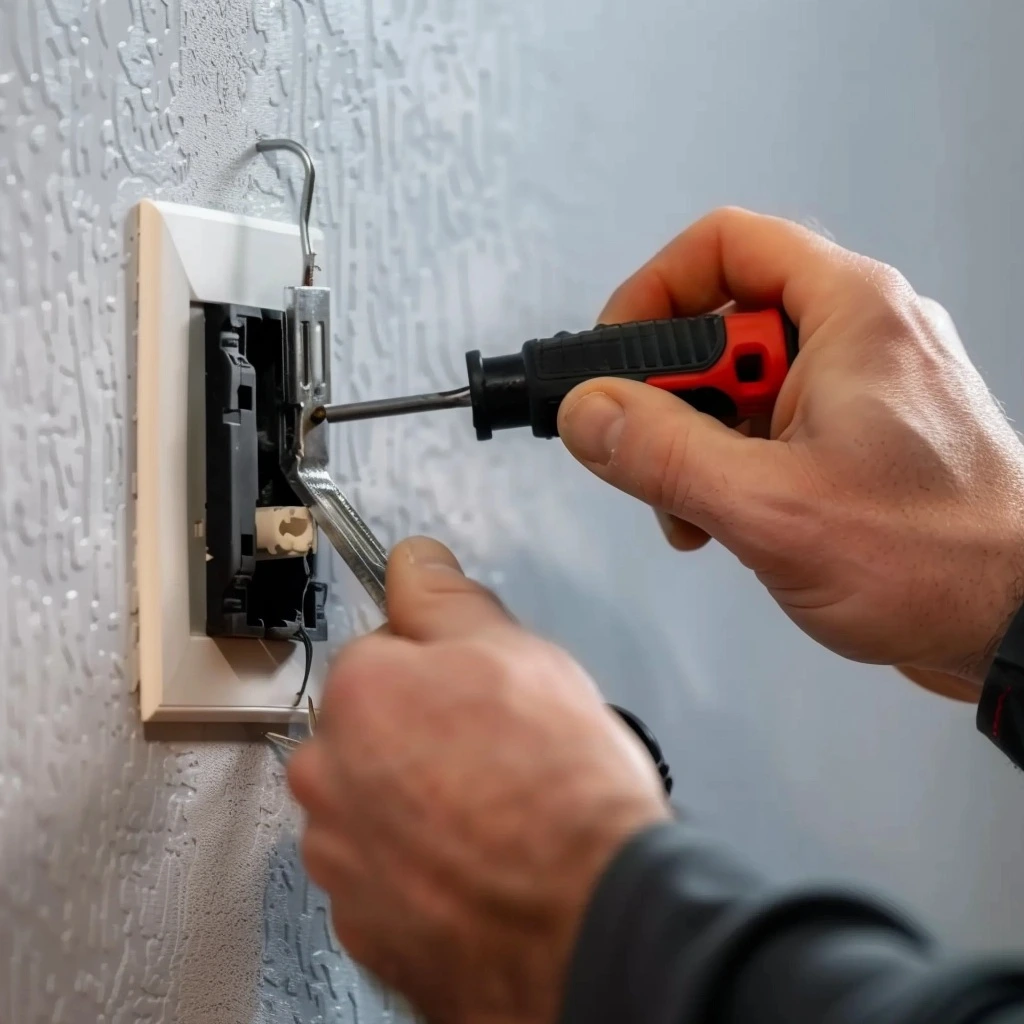
Checking All Connections
Connection quality directly affects system reliability and safety, making thorough inspection essential for long-term success. Poor connections cause voltage drops, create fire hazards, and lead to premature component failures that compromise your lighting investment.
Wire nut connections need proper tightness and weather protection to maintain reliable electrical contact. Verify that all connections are secure, properly insulated, and protected from moisture infiltration that could cause corrosion or electrical failures.
Transformer connections require special attention due to their critical role in system operation. Verify proper wire gauge, secure connections, and appropriate overcurrent protection. Loose transformer connections can cause voltage fluctuations that damage connected fixtures.
Ground fault protection testing ensures safety systems function properly and provide protection against electrical hazards. Test GFCI outlets and breakers regularly to verify they trip properly when fault conditions occur.
Junction box inspections verify that all electrical connections remain secure and properly protected from environmental conditions. Check for signs of moisture infiltration, corrosion, or mechanical damage that could affect connection integrity.
Buried connection testing may require partial excavation to verify underground splice quality and protection. While inconvenient, this inspection prevents future failures that would require extensive troubleshooting and repair work.
Frequently Asked Questions
How deep should I bury low-voltage landscape lighting wire? Low-voltage wiring typically requires burial at depths of 6-12 inches, depending on local codes and soil conditions. While less stringent than high-voltage requirements, proper burial depth protects wiring from mechanical damage and provides reliable long-term operation. Always check local electrical codes for specific requirements in your area.
Can I install lawn lighting systems myself, or do I need an electrician? Most low-voltage landscape lighting systems can be installed by motivated DIY enthusiasts, especially 12v outdoor lights that operate at safe voltage levels. However, the transformer connection to your home’s electrical system may require professional installation depending on local codes and your comfort level with electrical work.
How many fixtures can I connect to one transformer? Transformer capacity determines the maximum number of fixtures you can connect safely. Calculate total wattage of all connected fixtures and ensure it doesn’t exceed 80% of transformer capacity. For example, a 300-watt transformer should power no more than 240 watts of connected lighting to ensure reliable operation and allow for future expansion.
What gauge wire should I use for my wired landscape lights installation? Wire gauge depends on total system load and distance from the transformer. Most residential installations use 12 or 14 AWG wire, with heavier gauges required for longer runs or higher loads. Consult manufacturer recommendations and voltage drop calculations to determine appropriate wire sizing for your specific installation.
How do I prevent voltage drop in long wire runs? Voltage drop becomes problematic in installations with long distances between transformers and fixtures. Solutions include using heavier gauge wire, installing multiple transformers to reduce run lengths, or selecting fixtures designed for lower voltage operation. Calculate voltage drop for your specific installation to ensure adequate power delivery to all fixtures.
When should I replace LED landscape lighting fixtures? Quality LED fixtures typically last 15-25 years with minimal maintenance requirements. Replace fixtures when light output drops significantly, housing shows signs of damage, or electrical components fail. The long lifespan of LED technology means replacement is infrequent compared to traditional incandescent or halogen alternatives.
Installing outdoor LED landscape lighting transforms your property into a beautiful, functional space that provides years of enjoyment and increased value. By following proper planning, installation, and testing procedures, you can achieve professional results while avoiding common mistakes that compromise system performance. Whether you’re creating subtle accent lighting or comprehensive lawn lighting systems, these proven techniques ensure successful installations that deliver lasting satisfaction and reliable operation for decades to come. Start your lighting transformation today and discover how proper outdoor illumination enhances every aspect of your outdoor living experience.